Deciding if new pull-out pantry shelves are worth it comes down to how much daily convenience and better storage matter to you versus the upfront cost.
You’ll get a clear buyer’s guide here. You’ll compare real pros and cons and learn how to pick sizes, hardware, and configurations that fit your kitchen and your needs.
If you live in a busy house or hate reaching into deep cabinets, these systems can save time and cut wasted food by making items visible and easy to reach.
What you’ll learn: measure your cabinet opening, check door and face-frame limits, match shelf height to items, and choose quality slides and mounting so you don’t buy the wrong width or low-quality products that wear out fast.
This short guide avoids common buying risks and helps you judge value beyond more storage — think daily ease, less bending, and faster meal prep.
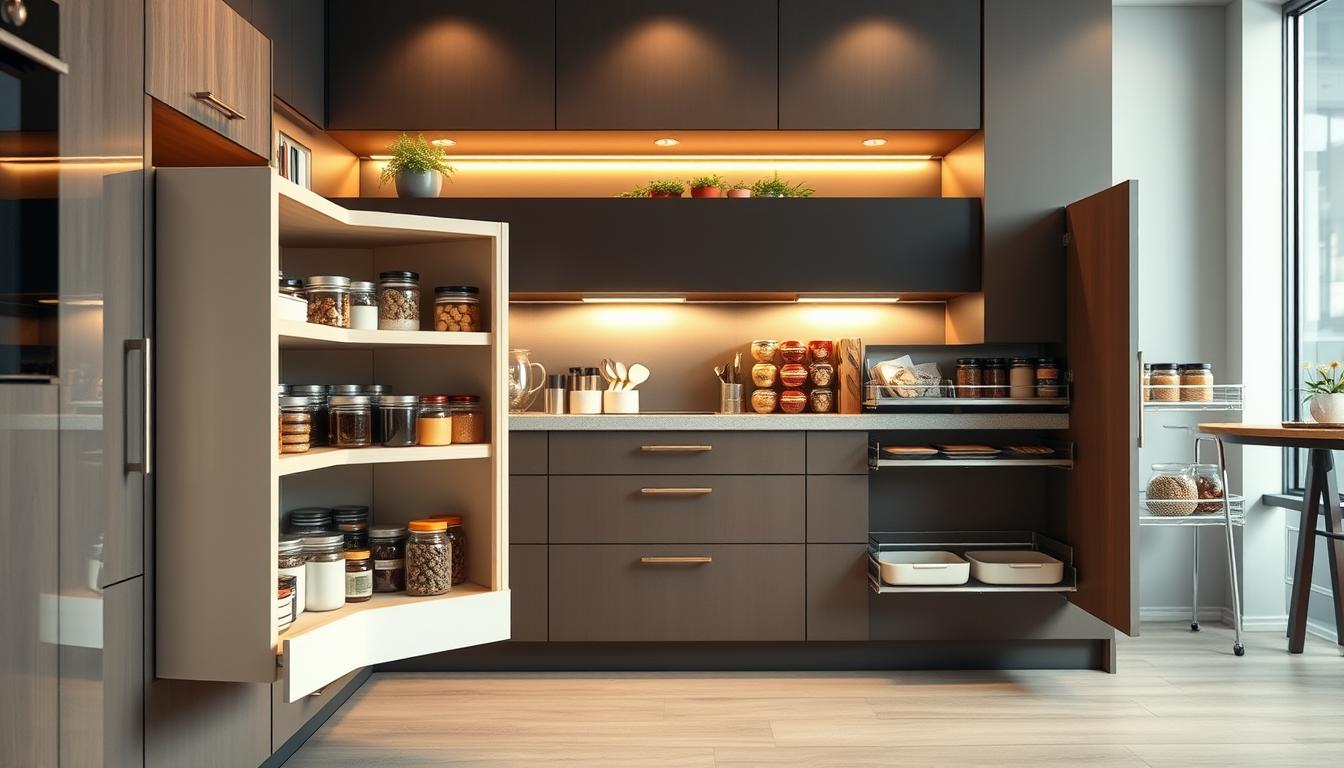
What Pull-Out Pantry Shelves Are and How They Work in Your Kitchen
This section explains the sliding units you’ll find when shopping for better cabinet storage. Think of many systems as a wooden box built like a short-sided drawer. That design is why stores often call them rollouts, pullouts, or slide-out shelving.

Rollouts, pullouts, and short-sided drawers explained
Rollouts and pullouts are names for the same idea: a shelf you can pull forward. Manufacturers often ship them ready to install, with slides and mounting brackets already attached. This makes setup faster and reduces alignment guesswork.
How slides and mounting hardware create full-extension access
Paired slides fasten to the box and to the cabinet so the unit glides smoothly. Many slides allow full extension so items come fully forward for easy access.
Best fit: pantry cabinet, base cabinets, and narrow openings
These units work well in a pantry cabinet for packaged goods, in deep base cabinets for pots or small appliances, and in narrow openings that otherwise sit unused. Measure the cabinet opening and width carefully—those numbers decide what models fit.
- Terminology to expect: rollout, pullout, slide-out.
- Key hardware: slides, mounting brackets, side vs base mount options.
- Where they shine: visibility, access, and usable width in tight spaces.
Pull-out pantry shelves: the biggest benefits you’ll notice day to day
Imagine opening a cabinet and finding everything you need within arm’s reach. That simple change speeds up routines and cuts the frustration of digging for items in the back.

Everything within reach
You pull the shelf forward and your pantry items come to you. No more crawling into deep cabinets or knocking things over.
Better visibility and less waste
When you can see all your goods, you rotate food forward and spot duplicates sooner. That lowers the odds of finding expired items later.
Faster meal prep and easier cleaning
Grabbing spices, pasta, or canned goods takes less time, which helps on busy weeknights.
Fully extended units make wiping spills simple. You won’t need to unload everything to clean the back of the cabinet.
Smarter use of space
These solutions let you stack tall bottles and paper goods vertically and organize your kitchen to match your needs.
- Less rummaging and fewer repeat purchases.
- Faster access to what you use most.
- Cleaner, safer storage with full extension for easy maintenance.
The downsides and trade-offs to consider before you buy
Weigh cost, fit, and wear factors up front to avoid surprises after installation. You pay up front for daily convenience. Whether it’s worth it depends on how often you use that storage and how much time it saves you.
Upfront cost vs. long-term value
High-quality construction and heavy-duty slides cost more but last longer. If you use the space daily, the convenience often pays off in saved minutes and less food waste.
What installation really takes
DIY is possible, but some customers report “above-average labor” when cabinets are out of square. Count extra time for trimming, shimming, or adjusting door clearance.
Fit limits and clearance problems
Measure door swing, face frame profiles, and opening height before you buy. These constraints can block smooth movement and force costly cabinet mods.
Wear, capacity, and safety
Low-grade slides can bind or rack. Overloading is a common failure — one user noted a socket broke after being WAY overloaded. Match slide rating and shelf construction to what you store.
- Real trade-off: upfront cost vs daily convenience.
- Installation: DIY or pro, factor in extra labor and potential cabinet work.
- Durability: choose slides and materials rated for your load to avoid failures.
Cost, value, and what “worth it” means for your storage needs
A focused upgrade to the right cabinets often delivers remodel-level usability with less cost and disruption. In many US homes, adding rollout units to existing cabinetry improves daily routines without the timeline and dust of a full remodel.
When a targeted upgrade beats a full remodel
If your storage needs are about visibility and faster access, converting one key cabinet can feel like a remodel. You save time and avoid major construction while getting immediate value.
Prioritizing the cabinets that return the most value
Start with the pantry cabinet you use every day. Next focus on under-sink areas and deep base units where items get lost. These three spots usually cut the most wasted time and duplicate buys.
Start small, confirm fit and quality
Order one product first to check measuring, load rating, and build quality. Brands like Shelves That Slide advise buying a single rollout to confirm fit before outfitting multiple cabinets.
- Target high-use cabinets for fastest ROI.
- Match hardware to load if you store bulk or appliances.
- Phase purchases to spread cost and validate performance over time.
Measurements that make or break your pantry shelf purchase
Before you order, measure carefully — small fractions of an inch change what will actually fit in your opening. A precise approach prevents returns and extra cabinet work. Use a steel tape and record three measurements for each dimension.
Cabinet opening width: planning for precise fit
Measure the clear opening front to back and left to right. Custom units can be made from 5″ to 39″ in 1/16″ increments, so note the exact width.
Record the opening at the top, middle, and bottom to spot any variance. Use the smallest number when ordering to avoid binding.
Depth choices and why 22 3/4″ is popular
Depth options typically run from 11 3/4″ to 31 3/4″, often in 2″ steps. Pick a depth that leaves room for mounting and back cabinet clearance.
22 3/4″ is common because it fits most base cabinets while allowing hardware behind the unit.
Height, opening height, and back obstacles
Check opening height so the unit clears face rails, door trim, and cabinet doors when extended. Measure from the bottom to the lowest obstruction.
Look for pipes, hinges, or internal trim in the back cabinet that shift where you can mount brackets or the slide mount. When in doubt, follow the manufacturer’s mounting measurement guide.
- Measure twice, order to the smallest opening.
- Account for mounting and bracket placement when selecting depth.
- Verify opening height and back cabinet obstacles before buying.
Choosing the right configuration for the items you store
Think about the heights and shapes of your goods before you pick a configuration. Matching form to function saves space and helps you keep items visible and accessible.
Double-height for everyday boxed staples
Double-height units work well for boxes of pasta, rice, and similar goods. Moderate side walls corral items during movement and prevent tipping.
Triple-height for tall bottles and rolls
Use triple-height options for paper towels, 2-liter bottles, and tall containers. They use vertical space efficiently and keep taller items upright.
Sloped sides for upper rows
Sloped compartments reduce tipping on upper runs and improve visibility. You can spot what you need without unloading the whole shelf.
Divider storage for flat cookware
Divider slots store baking sheets and cutting boards vertically so you grab one without unstacking. This saves time and protects edges.
Organizers and small boxes
Simple organizers and small boxes corral snack packs, seasoning packets, and baking supplies. They stop small items from shifting when you extend a unit.
- Tip: match the style to what you actually store so you don’t waste vertical space.
Materials, construction, and hardware quality to look for
Material choices and hardware decide whether your new unit feels solid or wobbly after a year of use.
Wood and box construction
Choose sturdy wood boxes. Baltic Birch, especially B/B grade 9‑ply, resists racking and holds screws better than low-grade panels.
This matters when you load the unit often; stronger construction keeps slides aligned and running smoothly.
Slide performance and soft-close options
Test for smooth extension and stability at full extension. High-quality slides from brands like KV or Wurth feel fluid and stay true under weight.
Soft-close slides cut slamming and vibration, protecting contents and preventing noise in busy kitchens.
Finish, brackets, and mounting choices
Decide between a natural wood finish or chrome accents to match your style. Chrome reflects light and helps visibility in darker cabinets.
Compare side mount versus base mount for space and strength. Pre-installed brackets and mounting hardware save you time and reduce alignment work.
- Quality hardware and fit are common praise points in customer feedback.
- Measure carefully; many users report perfect fit when they follow instructions.
- Look for solid warranty and reviews noting long-term quality, often 10+ years.
Installation options that fit your schedule and skill level
A clear installation plan keeps surprises to a minimum and ensures smooth results. You can take two realistic paths depending on your time and skill: DIY installation or hiring a pro.
DIY installation with ready-to-install units
Choose units that arrive fully assembled, with slides installed and mounting brackets attached. That setup removes much of the guesswork about bracket placement and slide alignment.
Simple workflow: mark a level line, set slide spacing, lightly fasten mounts, test movement, then confirm door clearance before final tightening.
Pro installation when your cabinet needs work or you’re short on time
Hire a pro if your cabinet is crooked, has a face frame complication, or if plumbing/electrical reduce mounting options. Professionals save you time and protect finish quality.
Common install mistakes to avoid
- Misalignment — uneven mounting causes binding and short life for slides.
- Incorrect slide spacing or uneven mounting surfaces that twist the unit.
- Forgetting to check door clearance or door mount interference before finalizing installation.
Pro tip: treat the first unit as a pilot install to validate measurements, hardware, and the process before outfitting multiple cabinets.
Making the most of tricky cabinets and tight spaces
Tight cabinets can become the most useful spots in your kitchen with a few simple adjustments. Start by planning for full extension so the back of deep cabinets is no longer a black hole.
For narrow openings, pick a unit depth that clears hinges and lets the cabinet door open fully. That preserves width while giving you complete access to items stored at the back.
Narrow openings and deep cabinets: turning wasted space into usable storage
Use full-extension systems so you can reach items without unloading the front row. Measure the opening twice and choose a width that fits inside the face frame without rubbing.
Working around face frames, cabinet doors, and limited width
When a face frame reduces clear width, slim-profile slides or inset installs often solve the problem. Check door swing and plan slide placement so the cabinet doors clear at full travel.
Under-sink and utility cabinet ideas
Create a dedicated under-sink zone for cleaners and soaps to stop stacking and burying supplies behind plumbing. In utility cabinets, organize frequently used items like trash bags and detergents so they stay visible and easy to grab.
- Tip: problem cabinets usually deliver the biggest satisfaction per dollar because access improves immediately.
- Start with one install to confirm fit, then expand to other cabinets.
Conclusion
Start by targeting the one cabinet that frustrates you most; that small change reveals real value fast.
When you weigh cost and benefit, pullout systems are usually worth it if you want better daily access in your kitchen without a full remodel.
Buy smart: measure openings precisely (many makers offer 1/16″ custom sizing and 22 3/4″ is a common depth), confirm door and face-frame clearance, and match height to what you store.
Prioritize quality: choose sturdy 9‑ply Baltic Birch construction, reliable slides (brands like KV or Wurth), soft-close if you value that feature, and firm mounting that stays aligned.
Practical next steps: measure today, compare configurations, and order one unit first to validate fit and performance before outfitting more cabinets.